KUWII User Manual
Switch to GermanTable of Content
- What is KUWII?
- Technical Information about the App
- App Appearance and Language
- User Profile
- Account Management
- Data on Device
- Subscriptions
- Private Spaces
- How to Create a Space
- How to Edit a Space
- How to Create a Space
- How to Leave a Space
- How to Invite Someone into a Space
- How to Join a Space
- How to set an Expiration Date for Space Invites
- How to Expire all Space Invites
- How to Enable/Disable Comments in a Space
- How to Enable/Disable Auto-Accept
- How to Accept Someone into a Space
- How to Remove a Member from a Space
- How to Give Admin Permissions to a Space Member
- How to Revoke Admin Permissions
- How to View the Space Change Log
- Posting Topics and Conversations
- Topics - Building Blocks of your Knowledge Base
- How to Create a Topic
- How to Open a Topic via the Repo
- How to Edit a Topic
- How to Delete a Topic
- How to Restore a Topic
- How to Delete a Topic Permanently
- How to Archive a Topic
- How to Unarchive a Topic
- How to Override Default Permissions for a Topic
- How to Figure out in which Spaces a Topic has been Posted
- How to Figure out which Users have Access to a Topic
- How to open the topic change log
- Installing KUWII as an App
KUWII is a progressive web app (PWA) designed for knowledge workers who want to grow personally and professionally while collaborating with others. Its motto—LEARN, GROW, SHARE—captures its core purpose: helping users develop their knowledge, connect with others, and share insights meaningfully.
At its core, KUWII offers a powerful Personal Knowledge Management (PKM) system. This system lets you organize everything from notes and tasks to files, links, and structured topics. You can build systems like a Second Brain or a Zettelkasten, track projects, and adapt the platform to fit your workflow using plugins.
KUWII also includes 'spaces'—collaborative environments where you can work with others. Each space can be used for teams, learning groups, friends, or any community you choose. You can share knowledge, post topics and comments, and build shared understanding together.
Supporting all of this is your AI-based Personal Assistant. It works within your topics and draws from your stored knowledge to help you reflect, plan, learn, and act. The more you use KUWII, the better your assistant understands your needs.
KUWII is a space for continuous learning and collaboration—designed to help individuals and organizations think better, work smarter, and grow together.
The app provides technical information such as the version, build number, and the user's cloud storage usage. It also includes details about the app provider (the legal notice) and links to the terms of service and data privacy agreement.
To view details about the app (version, build number), the legal notice, and your current cloud storage usage, click on your avatar (your profile picture) [1] and select 'About KUWII' from the menu [2].
The app’s appearance can be customized to match the user's preferences. Configuration options include the theme, font size, language, as well as date and time formats.
Note that the appearance settings will take effect on all devices.
To adjust the app's appearance, click on your avatar [1] and select 'Appearance' from the menu [2]. In the Appearance section, modify the settings according to your preferences and click 'Save' [3]. Confirm the restart of the app for the changes to take effect [4].
The user profile contains personal information such as the profile image, name, username (used in spaces), pronouns, bio, and links to websites. Only the name is required.
The username must be at least 5 characters long and cannot exceed 18 characters. Once set and saved, the username cannot be changed.
To update your profile image (also known as an “avatar”), your name, or other personal information, click on your avatar [1]. In the desktop UI The 'Edit Profile' section is displayed by default. On the mobile UI click on 'View Profile' [1a], then 'Edit Profile' [1b]. Make the necessary changes and click 'Save' [2].
When a user registers with KUWII, the app creates an account that includes personal information such as the user profile, the current plan, app preferences, and other technical data essential for the app’s functionality.
The account is protected by an authentication procedure during login. The user must use the authentication method selected during account setup (registration).
Additionally, the user must define an offline PIN, which is used for authentication when the device is offline.
When an account is deleted, all personal information is permanently removed from the app’s servers.
How to change your password: If your online authentication method is email and password, you can change your password by clicking on your avatar [1], selecting 'Account' [2], and then clicking the 'Change Password' [3] button. On the following screen enter your current password [4], the new password [5] and click on 'Set New Password
Note: If you use Google or GitHub for authentication, you cannot change your password in KUWII. Instead, you must change your password through the respective service provider.
How to delete your account: To delete your account, click on your avatar [1], select 'Account' [2], and scroll down to click the 'Delete Account' button [4]. Click 'Proceed with deleting the account' [5], then confirm by selecting 'Permanently remove your account' [6]. After reauthentication, your account will be deleted, and the app will redirect you to the KUWII website.
To logout your user, click on your avatar [1], then on Logout [2]
Security Notice: We highly recommend that you log out after your KUWII session when working on a publicly accessible device!
You can enable automatic logon [1] on the logon page.
KUWII keeps your session authorization active for a few days. When this authorization token expires, you will need to log in manually again, even if you have enabled auto-logon.
KUWII stores user data on every device where the app is used. This ensures that users can access their KUWII data even when offline. The app data on the device is encrypted.
For efficiency reasons, not all app data is stored on all devices. Large notes (e.g., notes with images) and files are initially stored only on the device where they were created. On other devices, these objects must be downloaded.
Notes are downloaded automatically when opened by the user. Files must be downloaded explicitly (see section on files).
This prevents large KUWII repositories, including topics shared by other users, from unnecessarily filling up storage space on all devices.
To remove large notes and files from your device and free up storage, open a topic that contains large notes and/or files. On the topic cover, next to the edit button, you will find an option [1] to remove large notes and files from your device.
In KUWII, users can choose from three available plans: KUWII Free, KUWII Premium, and KUWII Professional.
During registration, users are automatically enrolled in the free plan, which means there are no charges. The free plan provides most of the app’s features but with limited capacity compared to the paid plans, such as a lower cloud storage quota.
Paid plans are billed monthly and can be canceled at any time on a monthly basis.
To purchase a paid plan: Click on your avatar [1], select 'Upgrade' [2], and choose either KUWII Premium or KUWII Professional [3]. In the next screen, enter your payment information [4] and click 'Subscribe with obligation to pay' [5]. After successful payment, you will be redirected to a confirmation page.
To cancel a subscription: Click on your avatar [1], select 'Manage Subscription' [2] from the menu, then click 'Manage Subscription' [3] again. Click 'Cancel subscription' [4] to proceed.
To switch to a different plan: Click on your avatar [1], select 'Manage Subscription' [2], then click 'Manage Subscription' again [3]. Choose 'Update subscription' [4], select the new plan [5], and click 'Continue' [6] to complete the change.
To renew a canceled subscription (while still active): Click on your avatar [1], select 'Manage Subscription' [2], then click 'Manage Subscription' [3] again. Click 'Renew subscription' [4], then confirm by clicking 'Renew subscription' [5] on the next screen.
To add a payment method: Click on your avatar [1], select 'Manage Subscription' [2], then click 'Manage Subscription' again [3]. In the 'Payment Method' section, select 'Add payment method' [4]. In the next screen chose another payment method [5] and click on 'Add' [6].
KUWII provides 'spaces' for collaboration among users. The user who creates a space automatically becomes its owner and administrator. Space admins have the ability to invite KUWII users to join the space and remove existing members. Users who receive a valid invitation can request access to the space, and admins have the authority to accept or decline these requests. Once accepted, the user becomes a member of the space. Admins can promote members to admins and demote admins (except the owner) back to members. Both admins and members are collectively referred to as 'space participants.'
Posting Topics and Conversations:
Space participants can create and share topics within a space, assigning a default role to participants for each topic. The default roles are either 'reader' or 'editor'. Readers can view topics but cannot make any changes, while editors can update topics and related content but are not allowed to delete them. However, participants can delete old topics, which will remove all associated permissions for other participants regarding that topic. Additionally, space participants can post comments on topics.
Participants can also initiate a 'conversation' within a space by writing an initial statement. All space participants can then contribute by posting comments in the conversation.
Users who own a space (i.e., the creators) have the ability to delete it. When a space is deleted, all participants except the owner are removed, and all posts within the space are erased. However, deleted spaces can be restored through the repository, though previous posts and members will not be recovered.
Space Invitations and Privacy
Space invitations in KUWII are links that can be shared with people who are intended to join the space. Since KUWII users remain anonymous, their usernames are not globally visible. This means that space owners must personally know the invitee before sending an invitation. This system prevents users from being spammed with unwanted invitations. Technically, an invitation is a URL that can be shared via email, WhatsApp, or other messaging platforms.
Private spaces are also not visible to the general KUWII user base. Only those with a valid invitation can access a private space. Until they become members, invitees can only see the space's cover image, name, description, and the username of the space owner. This ensures a high level of privacy for private spaces.
To create a space: Click on 'Spaces' in the navigation bar [1], then 'Create Space` [2]. Enter a name (required) [3]. Optionally, add a description [4] and a cover image [5]. Click 'Create Space' [6]. We recommend using space cover images to enhance the visual appeal of the repository. You can add an image by either pasting it from the clipboard [5a] or uploading/dropping a file from your device [5b]. Once the image is loaded, you can adjust its position within the square frame representing the cover [5c]. Additionally, you have the option to rotate [5d] and zoom [5e] the image as needed. Don't forget to save your changes [5f] to ensure the selected cover image is applied.
To edit a space: Click on 'Spaces' [1]. Select the space [2], then click the edit button [3] on the space cover. Modify the cover [4], name [5], or description [6]. Click 'Update Space' [7].
To delete a space: Click on 'Spaces' [1]. Click the three dots [2] of the respective Space. Select 'Delete Space' [3].
Note: Only the space owner can delete a space, and the device must be online.
To leave a space: Click on 'Spaces' [1], then click the three dots [2] on the respective Space. Select 'Leave Space' [3].
Note: You cannot leave spaces you own. Leaving a space removes access to all non-owned topics.
To invite someone to a space: Click on 'Spaces' [1], then click the three dots [2] on the respective Space. Select 'Send Invite' [3]. Share the invite link. Alternatively, open the space and click on 'Send Invite' [4]
To join a Space: Open the invite URL in a browser. If valid, you will see the space details [1]. Click 'Login to Continue' [2] or 'Create Account' [2b] (if you are new to KUWII). Once logged in, click 'Join Space' [3]. You will get a confirmation [4]. Once the space admin lets you in, you will see a small bell at the Spaces-button [5]. In the Spaces list you see the new Space [6]. Note that the 'NEW' tag goes away once you open the Space.
When the Space if not configured for auto-accept then an admin needs to let you into the space manually. This is similar to a party: you get an invite to a party but still you need to ring the bell at the door for the host to open it.
If you are already a space member, the space will open after login.
To set an invite expiration timeframe: Click on 'Spaces' [1], then click the three dots [2] on the respective Space. Select 'Space Settings' [3]. Adjust 'Invitation Link Expiration' [4]. Go back [5]. The settings will be saved.
If you set an expiration date then this will not affect the current invites. If you already issued invites then expire these (see below) and create a new invite. The expiration date will apply to the new invite.
To expire all active invites: Click on 'Spaces', then click the three dots on the respective Space. Select 'Space Settings'. Click 'Expire Invites'.
This option is unavailable if no active invites exist.
To enable or disable comments in a Space: Click on 'Spaces' [1], then click the three dots [2] on the respective Space. Select 'Space Settings' [3]. Toggle the Disable-Comments switch [4].
When comments are disabled in a Space then inside the posts the information 'Comments are disabled' will be displayed instead of the comment section.
To enable or disable auto-accept for access requests: Click on 'Spaces', then click the three dots on the respective Space. Select 'Space Settings'. Toggle the Auto-Accept switch.
For Spaces with auto-accept we highly recommend to use expiration dates for invites. Otherwise anyone who gets hold of the invite URL is able to join the Space!
To accept or deny space access requests: When there are Space access requests then the little bell is displayed on top of the Spaces-button [1]. Space owners and admins see requests at the top of the Spaces page [2]. Each request displays the requestor’s avatar, name, and username, along with an accept button [3]. To deny access click on the three dots [4] and click 'Deny Access' [5].
To remove a member from a space: Click on 'Spaces' [1], then open the respective Space by clicking on it [2]. A click on the avatar cluster [3] will unhide the Space members. Click on the three dots on the member you want to remove [4], then select 'Remove Member' [5]. Confirm the warning [6].
Only Space owners and admins can remove Space members.
When you remove a Space member then all posts of this user will be removed. This inludes all posted topics which means that the access to these topics will be removed as well.
To promote a member to admin: Click on 'Spaces' [1], then open the respective Space by clicking on it [2]. A click on the avatar cluster [3] will unhide the Space members. Click on the three dots on the member you want to promote [4], then select 'Make Admin'. Confirm [6].
Only owners and admins can give Admin permissions to Space participants.
Space admins can change the Space details (cover, title, description, settings), send invites, edit member permissions and accept new members.
To demote an admin to a regular member: Click on 'Spaces' [1], then open the respective Space by clicking on it [2]. A click on the avatar cluster [3] will unhide the Space members. Click on the three dots on the member you want to deomote [4], then select 'Revoke Admin Permissions' [5]. Confirm [6].
Only owners and admins can demote Admins to Space members.
To view the change log of a Space: Click on 'Spaces' [1], then click the three dots [2] on the respective Space. Select 'Change Log' [3]. The change log contains all actions on the Space [4].
To post a topic in a space, click on Spaces [1], select the desired space [2], then click on the + button next to the Posts button [3]. Select 'Share Topic' [4], then choose a topic from the list [5]. Next, select the default role [6]. Click Next [7], optionally enter any text you wish to include in your post [8], then click 'Share Topic' [9]. The post is shown in the space page [10] showing the default role that applies [11]. All space participants, including you, will be able to comment on this post.
Only active topics (i.e., non-deleted and non-archived) can be posted. Topics that have already been shared will not appear in the topic list.
Reader Default Role: All space participants will have read-only access to the topic by default, except for you as the topic owner, who will retain full access.
Editor Default Role: All space participants will be able to make changes to the topic except for deleting it. However, dependent items such as tasks or notes can be deleted by editors.
You can post topics in multiple spaces. Users will always have the highest default permission granted by any post they can access. For example, if user X is a participant in both Space A and Space B, and you post the topic in Space A with Reader permissions and in Space B with Editor permissions, user X will have Editor permissions. If user X later leaves Space B, their permissions will revert to Reader, as they are still part of Space A.
Topics can also be posted directly from the main page of an opened topic: click on the settings button on the topic cover image [1], then select 'Post into Space' [2]. In the next dialog accept the space that is shown by default or select another space from the list under 'Select Another Space' [3]. Select the desired default role [4], optionally add some text [5] and click on 'Post into Space' [6].
To start a new conversation in a space, click on Spaces [1], select the space [2], then click the + button next to the Posts button [3]. Select New Conversation [4], enter your message in the dialog box [5], and click 'Post' [6]. All space participants, including you, will be able to comment on this post [7].
To comment on a post: Click on Spaces [1] and select the space containing the post [2]. Locate the post in the list [3]. Enter your comment in the text field labeled 'Add a comment' [4]. Click the arrow button next to the text field to submit your comment [5]. All Space participants can see your comment [6]. On the mobile phone you first need to expand the comments section [6a] to see the comment [6b].
To delete a comment: Click on Spaces [1] and select the space containing the post [2]. Locate the post [3] and click on the three-dot menu [4]. Select 'Delete Comment' [5] from the menu and confirm the action.
Space members can delete only own comments. Space admins can delete all comments.
Deleted comments will be replaced with the message: 'This comment was deleted on (date)' [6].
See also section 'How to Enable/Disable Comments in a Space'.
To mention a space participant in a post, type @ and select the user from the list [1]. As you type, the list will filter accordingly. Mentioned users are displayed in a different color [2] and appear as links, and clicking on a mention will display their profile.
To mention a topic in a post, type # and select the topic from the list [3]. The topic is displayed in a different color [4].
If the topic is in the user's repository, clicking the mention will open it. If not, a popup will notify the user that the topic is not in their repository.
Pinned posts appear at the top of the post list [1].
To pin a post, click on the three-dot menu [2] and select 'Pin Post' [3].
To unpin a post, click on the three-dot menu [4] and select 'Unpin Post' [5].
To edit a post: Click on the three-dot menu [1]. Select 'Edit Post' [2]. Modify the text [3] and confirm the changes by clicking 'Change Post' [4] and confirm.
Edited posts will be marked as edited [5].
To delete a post: Click on the three-dot menu [1] and select 'Delete Post' [2].
When a topic post is deleted, all space participants (except the owner) will lose access to the topic.
Posts can only be deleted while the device is online.
In KUWII, topics serve as the fundamental building blocks of a personal knowledge base. Tasks, notes, links, files, and plugin data (also known as “dependent items”) always belong to exactly one topic. Each topic includes a cover image, a name, and a description. While cover images are optional, we highly recommend using them to enhance the visual appeal of your knowledge base. Descriptions are also optional but strongly encouraged.
The creator of a topic automatically becomes its owner. Only the owner has the authority to delete a topic.
To create a topic: Open the home page and click 'Create Topic' [1]. In the Create Topic dialog, click 'edit cover image' [2] (optional step, but recommended). Upload a cover image from your file system [2a] or paste an image from the clipboard [2b]. Ajust the image as needed by zooming [3] and rotating [4]. Save the image [5]. Back in the Create Topic dialog, enter a topic name (mandatory) [6]. Optionally, add a description [7]. Click 'Create Topic' [8] to save. The new topic is opened [9].
One way to open a topic is via the topic repository browser (short 'repo'). On the desktop the repo can be expanded via the 'Repo' button [1]. The non-archived topics are listed in the 'Topics' section of the repo [2]. A click on a topic label will open the topic. The repo can be closed via the double arrow button [3].
It is handy, especially on a larger screens, to keep the repo opened so that you can quickly switch from one topic to another.
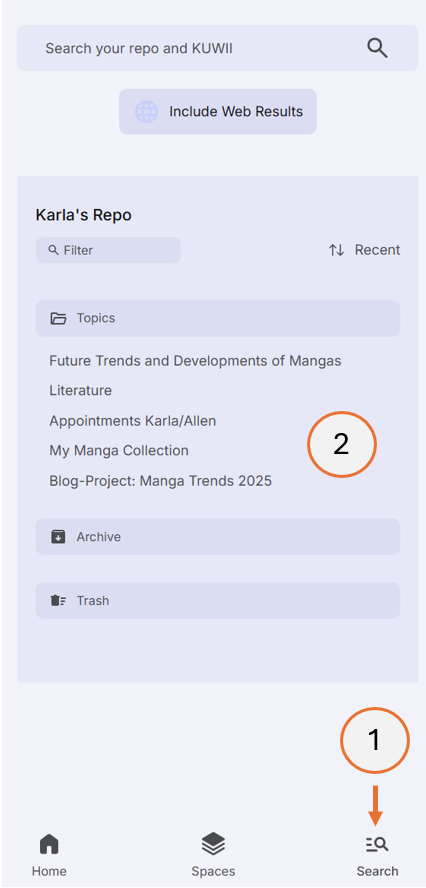
On the mobile phone the repo can be opened via the Search button [1]. A click on a topic label will open the topic.
To edit a topic: Open the topic. Click the edit button [1] located at the bottom of the topic cover. Modify the name, description, or cover image as needed. Click 'Update Topic' [2] to save your changes. You may need to scroll down to make the button visible.
To delete a topic: Open the topic. Click the settings button [1] at the bottom of the topic cover. Select 'Delete Topic' [2] from the context menu and confirm the warning.
Note: Deleting a topic also deletes all posts associated with it. However, topics are “soft deleted,” meaning they can be restored later via the repo. While a topic remains in the deleted state, its data still counts toward your cloud storage usage. Keep in mind that restoring a topic does not recover its posts.
To undelete a topic: Open the repo via the search button [1] or via the repo button (desktop only). If the topics list is very long you may want to click the 'Topics' header to collapse it [2]. Click the 'Trash' header [3] to view deleted items. Click on the topic [4], then select the three-dot menu [5] next to its name. Choose 'Undelete Item' [6] from the context menu.
It is also possible to restore all deleted items in one go: Open the repo via the search button [1] or via the repo button (desktop only). Click the 'Trash' header [2] to make the context menu visible. Click the three dots [3] and select 'Undelete All' [4].
To delete a topic permanently: Open the repo via the search button [1] or via the repo button (desktop only). If the topics list is very long you may want to click the 'Topics' header to collapse it [2]. Click the 'Trash' header [3] to view deleted items. Click on the topic [4], then select the three-dot menu [5] next to its name. Choose 'Permanently Deelete Item' [6] from the context menu.
To empty the entire trash: Open the repo via the search button [1] or via the repo button (desktop only). Click the 'Trash' header [2] to make the context menu visible. Click the three dots [3] and select 'Empty Trash' [4].
To archive a topic: Open the topic. Click the settings button [1] at the bottom of the topic cover. Select 'Archive' [2] from the context menu.
Archived topics will be excluded from search results and other features. You can also archive a shared topic.
When you archive a shared topic this does not have any effect on other users. The archive-state is just a user-specific property of a topic.
To unarchive a topic: Open the repo via the search button [1] or via the repo button (desktop only). If the topics list is very long you may want to click the 'Topics' header to collapse it [2]. Click the 'Archive' header [3] to view archived topics. Open the topic by clicking on it [4]. Click the settings button [5] at the bottom of the topic cover. Select 'Unarchive' [6] from the context menu.
Each posted topic has a default role that determines the permissions for space participants. If you want to override this default role for a specific user: Open the topic. Click the settings button [1] and select 'Permissions' [2] from the context menu. In the Override Default Role dialog, choose the user [3] and assign a new role [4]. If no override is needed, select 'No override' to maintain the default role. Click 'Assign Role' to apply the changes.
Only the topic owner is allowed to set the permissions.
Override permissions can be granted to users even if they do not yet have access to the topic (because the topic has not been posted). Whenever the topic gets accessible for the user then the overriding permissions take effect.
The topic main page contains a section 'Shared in Spaces' [1] that you can use to figure out into which space a topic has been posted with which default role.
The topic main page contains a section 'These Users have Access' [1] that you can use to figure out which user has which effective permission for the given topic.
To view the change log of a topic: Open the topic and click on the settings button [1]. Then select 'Change Log' [2].
KUWII is a web application that runs in any modern browser, including Chrome, Edge, Safari, Opera, and Firefox. While it does not require installation to function, you have the option to install KUWII as an app using your browser’s built-in installation feature. This process does not involve downloading from an app store but instead utilizes native browser functionality.
Installing KUWII as an app offers added convenience, as it places an icon on your desktop (Windows) or home screen (mobile devices) for quick access. On Windows, the app can also be pinned to the taskbar.
Please note that not all browser and operating system combinations support app installation.
Chrome: Open KUWII in Chrome, click the three-dot menu in the top-right corner, select ‘Cast, save and share’, then click ‘Install KUWII’. After installation, the KUWII icon will appear on your desktop.
Edge: Open KUWII in Edge, click the three-dot menu in the top-right corner, select ‘Apps’, then click ‘Install KUWII’. Edge will install the app and prompt you to pin it to the taskbar, Start menu, or create a desktop shortcut.
Chrome: Open KUWII in Chrome, click the three-dot menu in the top-right corner, select ‘Add to Home screen’, then tap ‘Install’. The KUWII icon will appear on your home screen.
Opera: Open KUWII in Opera, click the three-dot menu in the top-right corner, select ‘Add to...’, then choose ‘Home screen’. The KUWII icon will appear on your home screen.
Firefox: Open KUWII in Firefox, click the three-dot menu in the top-right corner, then select ‘Add app to Home screen’. The KUWII icon will appear on your home screen.
Safari: Open KUWII in Safari, tap the Share button at the bottom center of the screen, then select ‘Add to Home Screen’. The KUWII icon will appear on your home screen.
Opera: Open KUWII in Opera, click the three-dot menu at the bottom, tap the Share button, then select ‘Add to Home Screen’. The KUWII icon will appear on your home screen.
Edge / Firefox: Open KUWII in Edge or Firefox, click the menu button at the bottom right, tap the Share button, then select ‘Add to Home Screen’. The KUWII icon will appear on your home screen.